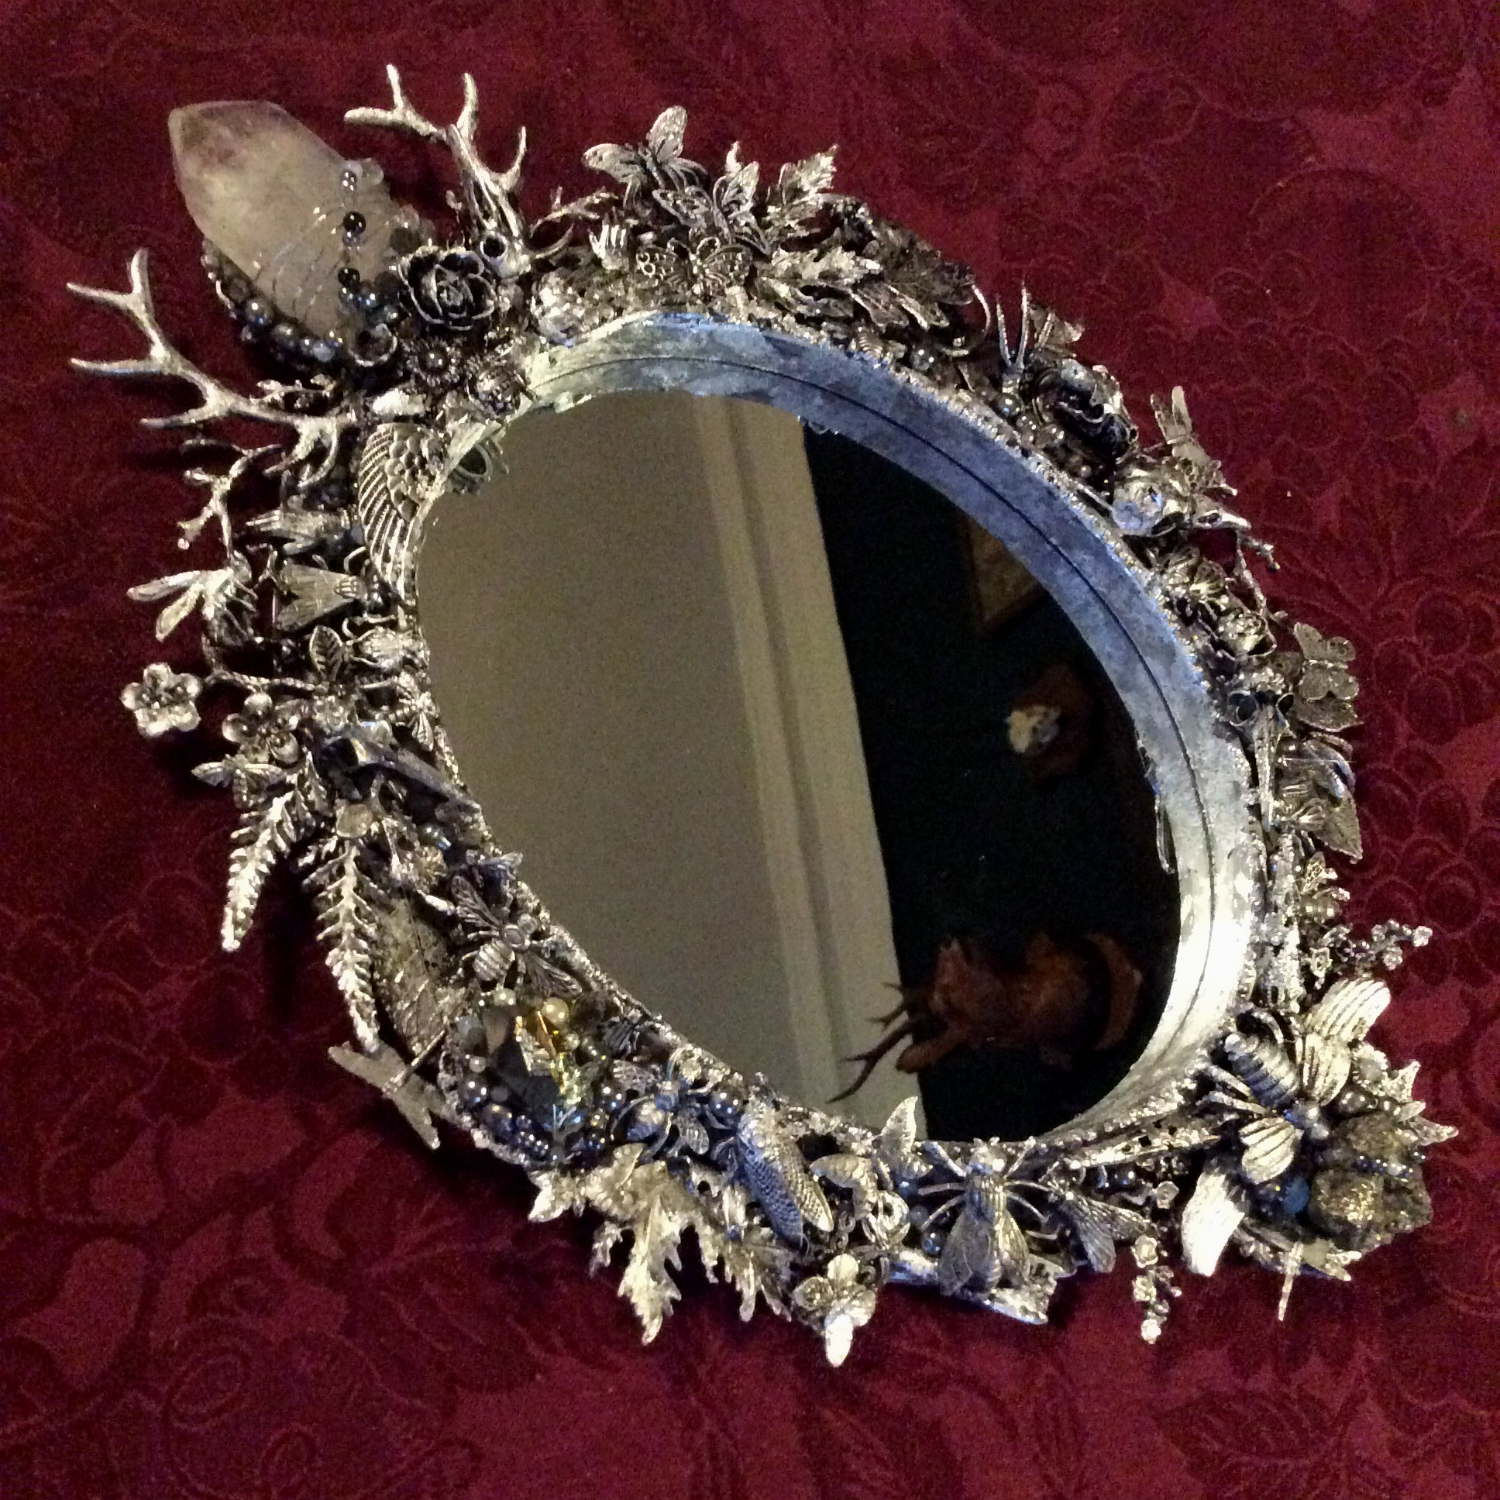
 I had been wanting to use some of my metal insect stampings to make a mirror like this for ages. Then Colleen Doran sent me this beautiful crystal along with a Patron gift and I decided to build the mirror around it.
As always, I start with washing the assemblage materials!
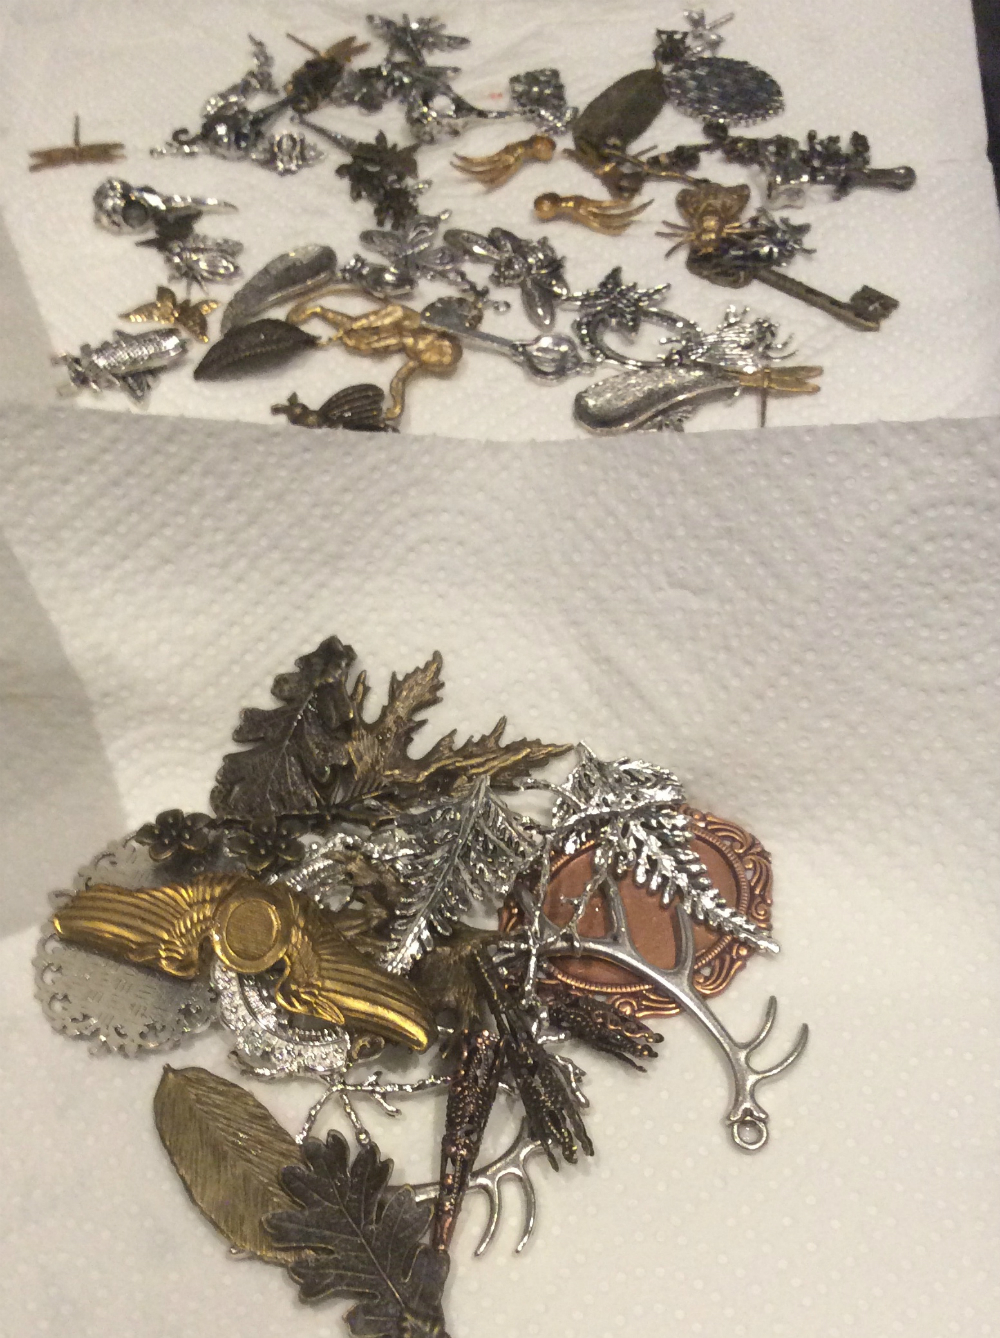 A good hot soap and water scrub makes a huge difference in how primer, paint, adhesives and varnish adhere to molded metal and plastic objects. Removing all traces of mold release, skin oils and dust makes such a difference.
Then, I glued all the stampings onto the frame with the glue gun. If I needed to reposition something, I just pried it off and then pried the glue blob off the frame.
I also often repositioned things by adding some fresh hot glue to the blob behind a piece, softening it enough to adjust it. I don’t really have a plan for most of my assemblage projects! 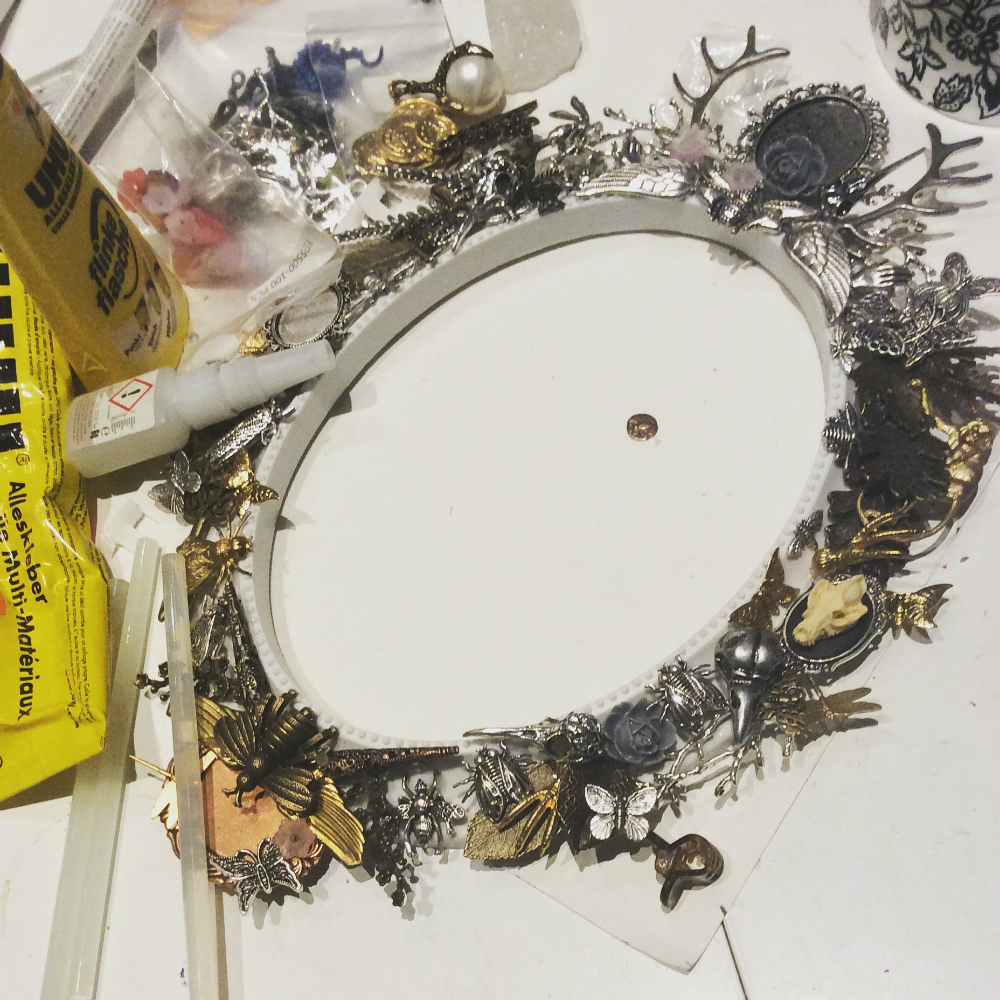
Once everything was glued down I spraypainted it all with my excellent silver acrylic craft spraypaint. Yes, I should have primed it first. But I was confident in my washing job and the paint.
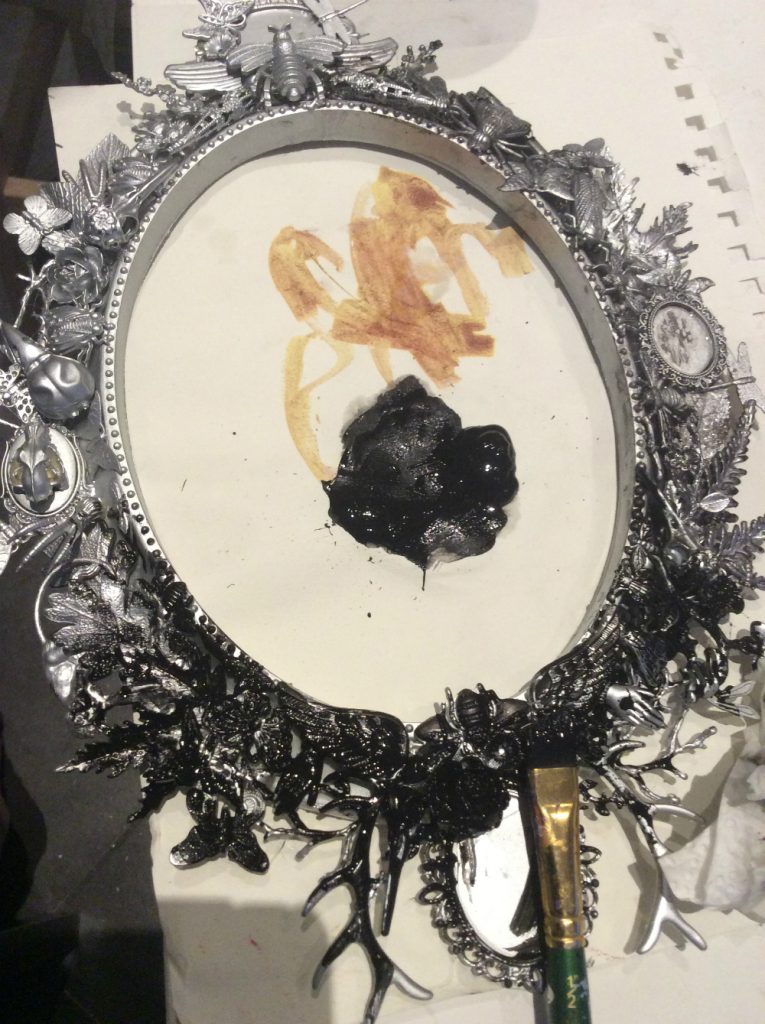 After the spraypaint cured overnight (acrylic, yes, but all spraypaint has solvents and needs a night’s cure), I gave it a black acrylic wash.

Once the wash dried overnight, I coated the whole thing with an isolation coat of Mod Podge Matte. The Mod Podge is thick enough that it also helped hold the stampings in place. Mod Podge is an isolation coat, to separate the plastic-y glue-gun glue and the foamed polystyrene frame base from the next phase. I let it dry for 24 hours, always.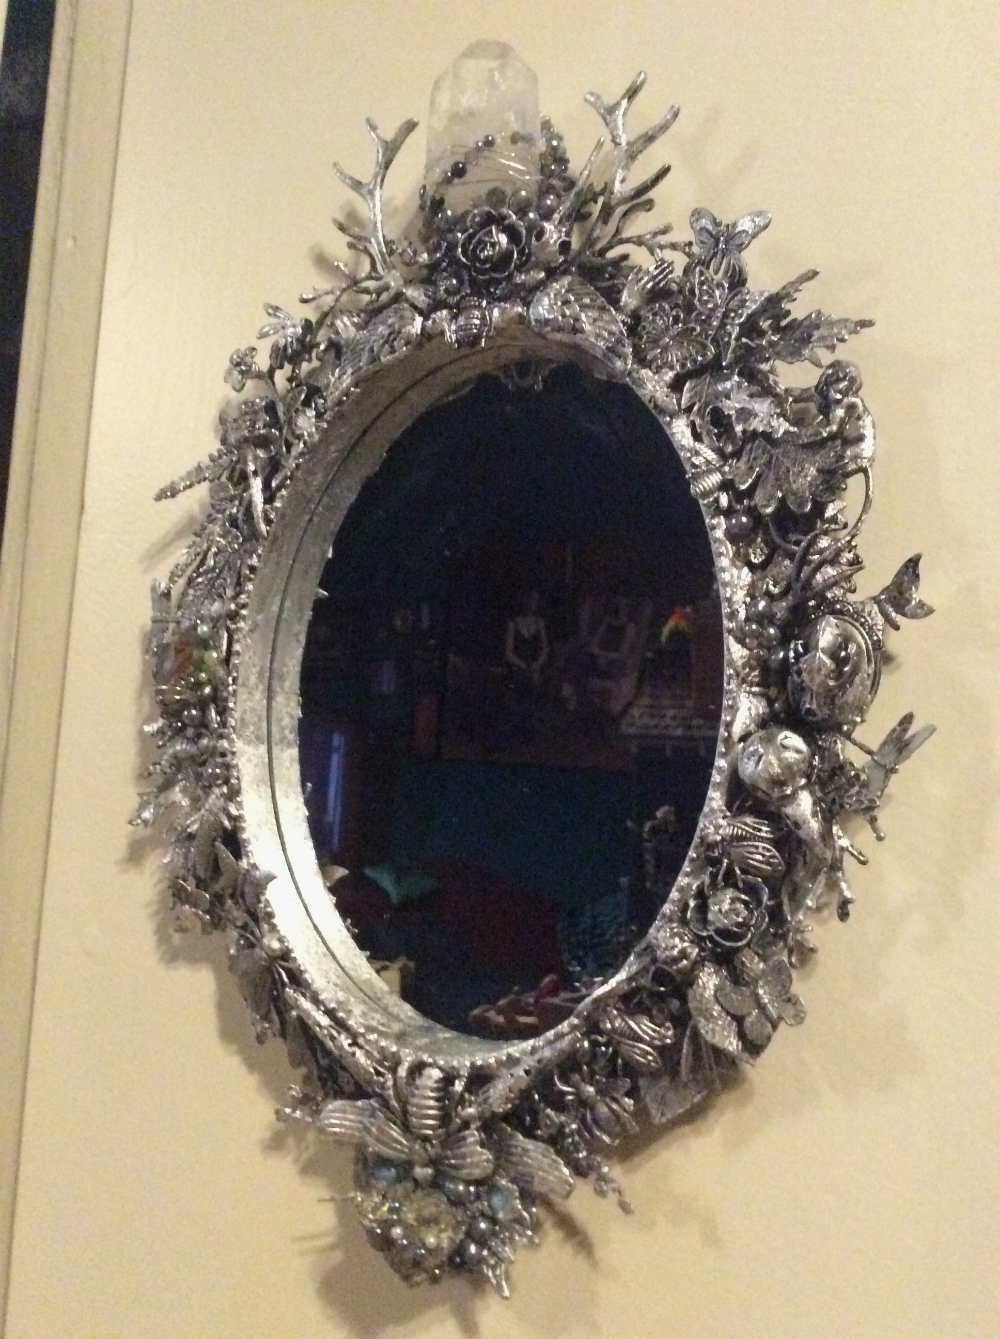
There’s another thing that matters a LOT with assemblage art. It’s quite similar to a crucial practice for baking and decorating cakes!
 That thing is — time. Give it some time. Cakes that you are gonna to glaze or frost have to be cool or cold, not just room temperature, and in fact your best bet is freezing them overnight and icing them frozen. It makes everything so much easier!
Same principle with primers, isolation coats, adhesives and handling glued items. You got to give your assemblage project time to set and cure completely before you are handling, moving or painting it.
A frozen cake layer is far less likely to shed crumbs into your buttercream or break in half as you lift it.
With your project, same idea except you’re also talking about bad chemical reactions between adhesives and paints, orange peel effects, bond failure, and a bunch of other deterioration issues. Adhesives and paints contain solvents, even if the solvent is only water ( as in, water-soluble!) and those solvents need to off-gas or evaporate.
But what if you are an insanely impatient person, who cannot stand to wait for any form of gratification, like me???
You must work on multiple projects at once. You must start thinking about projects in terms of PROCESSES, the same way bakers think about cakes in terms of components. The folks on model car boards and action figure customizing boards are a great resource for staggering processes.
You’ll see them post about “clearcoat day” or “metallic black day”. They paint everything that needs to be painted white on a single day, or do all the sanding for a bunch of kits over a weekend. That way, you aren’t wasting time waiting for things to dry or cure – you’re into the next process for a bunch more parts of your project.
Yes, this means you will have half-finished projects everywhere, all the time. It is the price of efficiency. Personally, I’ll work through all the processes on three or four related projects, then clean up the huge fucking mess and then do something that doesn’t make a mess for a while!
This project required the addition of Ingredient: Time at many stages.
 After the Mod Podge dry time, I got out my clear craft acrylic gloss, the kind that comes in a bottle with a flip-top. This would be the base for the silver leaf.
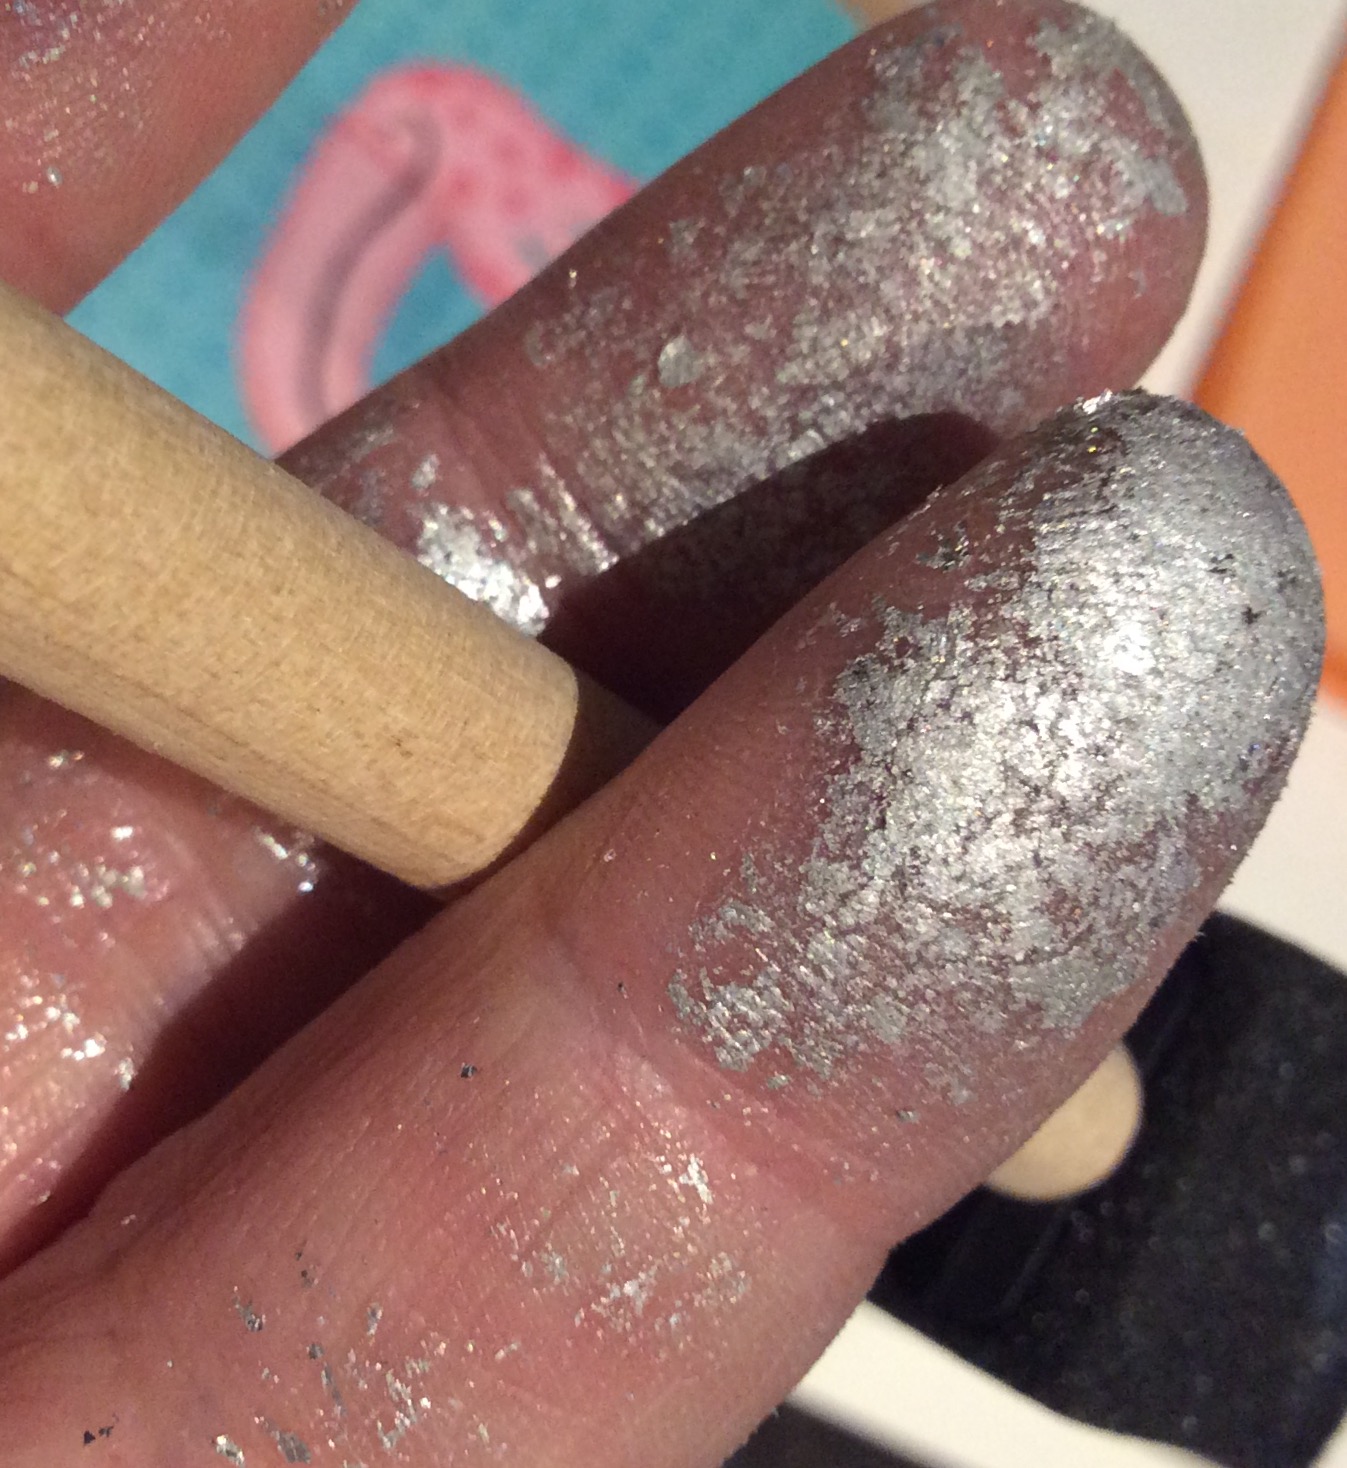
I went around the frame, brushing raised areas I wanted to highlight with gloss, waiting a minute for it to get a little tacky, and tapping on silver leaf with my fingertips or grabbing the leaf with tweezers and touching it to the tacky gloss so it adhered.
Once I had silver leaf all over in a nicely variegated application, I patted it all down with my fingertips and painted the whole thing with gloss. I sort of carelessly scrunch down/scrub away the loose leaf with my brush.
This is not how you are supposed to apply metal leaf! DO not do what I do! Anyway, overnight drying, then another coat of gloss. Overnight drying AGAIN.
edit. to add: at some stage I also highlighted some areas with the Tamiya Chrome Silver model paint I bought for my Lilandra custom!
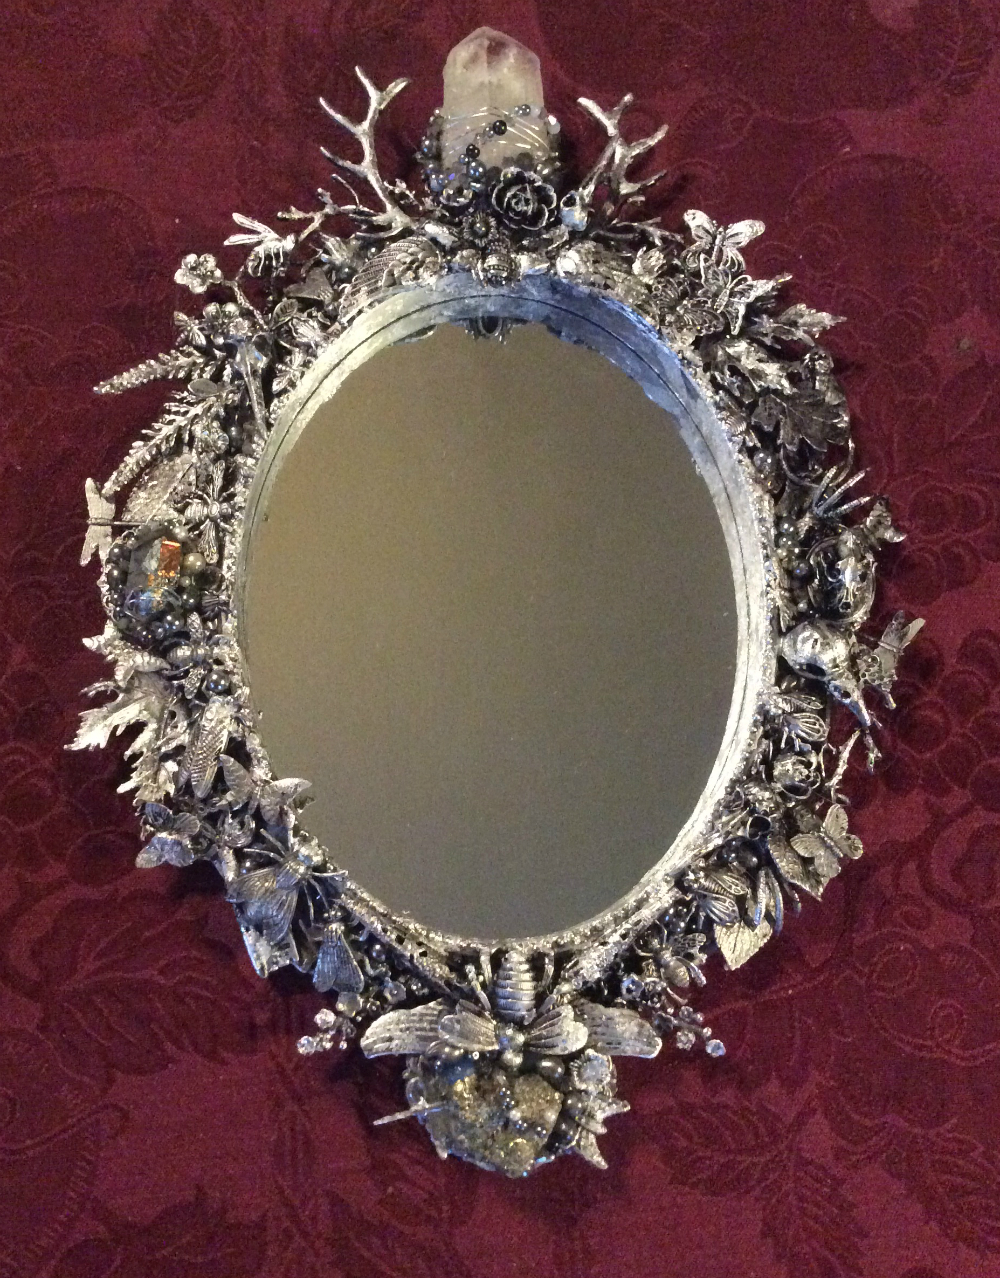
And then, the final stage: covering the whole thing with water-clear, super-shine solvent-based brush-on acrylic gloss varnish.
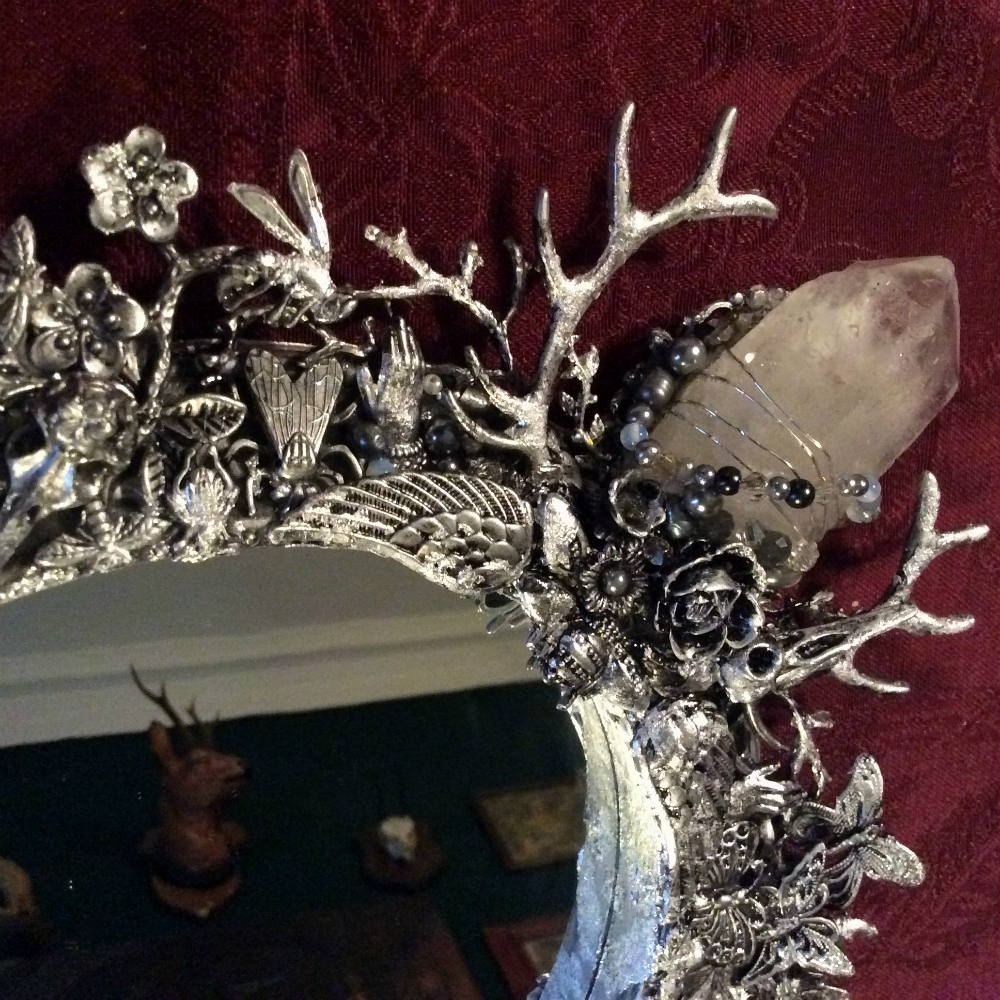 But wait! I still had to add the crystals! So I wrapped them in wire, and adhered them with Apoxie Sculpt, my favorite epoxy clay.
Epoxy clay will stick anything to anything, nearly. Overnight curing AGAIN, and then I turned the frame over and reinforced all the bonds by pouring a different kind of UHU Alleskleber, the Flinke Flasche or “Nimble Bottle” liquid into crevices, and added all the pearls and crystal beads to crevices in the front with the same liquid glue.
I honestly don’t know what the chemical relationships are between all these layers, and there is no guarantee this piece is archival.
I kinda lost the thread at some point! Model car people say put your hottest (most chemically active) layer on last, because you need to isolate the plastic base of the kit, which solvents will attack (hence the Mod Podge and craft acrylic varnish before the “hot” varnish). Fine artists say you can put oil (chemical solvent) over acrylic (water-based) but not the other way around, because acrylic cures completely and won’t offgas into the oil. But assemblage artists say don’t put oil over acrylic on a piece that may flex, because acrylic remains flexible (plasticky) even when dry, but oil (after years of offgassing!) dries to a brittle film.
Adhesive solvents will also attack and react with some plastics (the notorious fogging caused by cyanoacrylate superglues) or melt the paint off it. I have seen both Quick Grip and UHU Extra Alleskleber melt a long-cured film of acrylic spraypaint – but not tube acrylic, which they bond with.
Solvents, man. I decided to just see what happens with this one.
If it deteriorate rapidly I will let you know!
Meanwhile, did you know you can support me and Colleen Doran on Patreon? Colleen Doran knows a tremendous amount about fine art materials, far more than I do, and posts great tutorials about things like the archival/lightfastness ratings of markers and how to use oil paint!


