 I had sculpting classes in art school; I submitted to them ungraciously.
I considered sculpting an unnecessary detour, an obstacle to my mission of learning to draw as well as possible, as fast as possible, as soon as possible. I wasn’t comfortable with the visceral, touchy-feely quality of sculpting either; as a young artist I was rigid and frightened of anything where my success or failure couldn’t be quickly quantified.
I was especially frightened by anything abstract. In one class we used blocks of soapstone and chiseling tools, and I watched in awe as a classmate confidently set into her piece. “How do you know where to carve?” I asked her. “I just look at the natural rock, and let it tell me what forms want to emerge.” I found that terrifying. I did not want to hear about anything “emerging”. I wanted to draw the X-Men.
I wasted those opportunities, but luckily, sometimes both ars and vita are longa.
I got interested in sculpting in 2000 or so, after making a lot of fancy cakes with gold-leafed marzipan dragons and fondant-and-royal icing Fabergé eggs. I was “retired” as an artist at the time, not drawing or painting, just compulsively making things.
I was reading about customizing action figures on these clunky yahoo forums, and I heard about epoxy clay. Epoxy clay sounded great: a strong self-hardening clay that would adhere to nearly anything and hold fine detail with no shrinkage, and you could buy it at TAP in El Cerrito. I bought some, but then I got so consumed with my dollhouse build I left it in the craft cabinet for a long time.
At some point I started making things (link NSFW) for my dollhouse in polymer clay.
Polymer clay has a slightly, faintly greasy feel in the hand which I can tolerate, but don’t love, and it has other flaws. You have to bake it, and if you want to incorporate things that would melt in the oven in your sculpt, you’re screwed. The cured clay isn’t a neutral surface- you can paint it with acrylics, but only some varnishes, adhesives and primers adhere to it.
So eventually I did try the epoxy clay. It’s a two-part putty that you knead together- equal size balls of resin and hardener- which firms up gradually over an hour or so. It’s hard to the touch in a day and fully cured in a week or two. It comes in various basic colors; I started with the “natural” or grey. I found it okay to the touch, and I loved the self-hardening property, but there was a granular quality to the handling and finish I disliked. I gave my stash of it to the sculptor Aimee Baldwin, who uses it on the beaks and feet of her incredible “vegan taxidermy” birds, and moved on to other projects.
Art, like life, is made of second chances, even when it doesn’t feel that way.*
There’s always another opportunity to fall in love. And since I am a materials geek as an artist much more than a tools or techniques geek, I kept reading about resins, adhesives and clays. When I started my really just fully insane Narnia Jadis-and-her-sleigh aka Snow Queen project in 2013, I realized epoxy clay was the perfect thing to join together disparate materials. (below, first preview ever published of the reindeer and sledge!)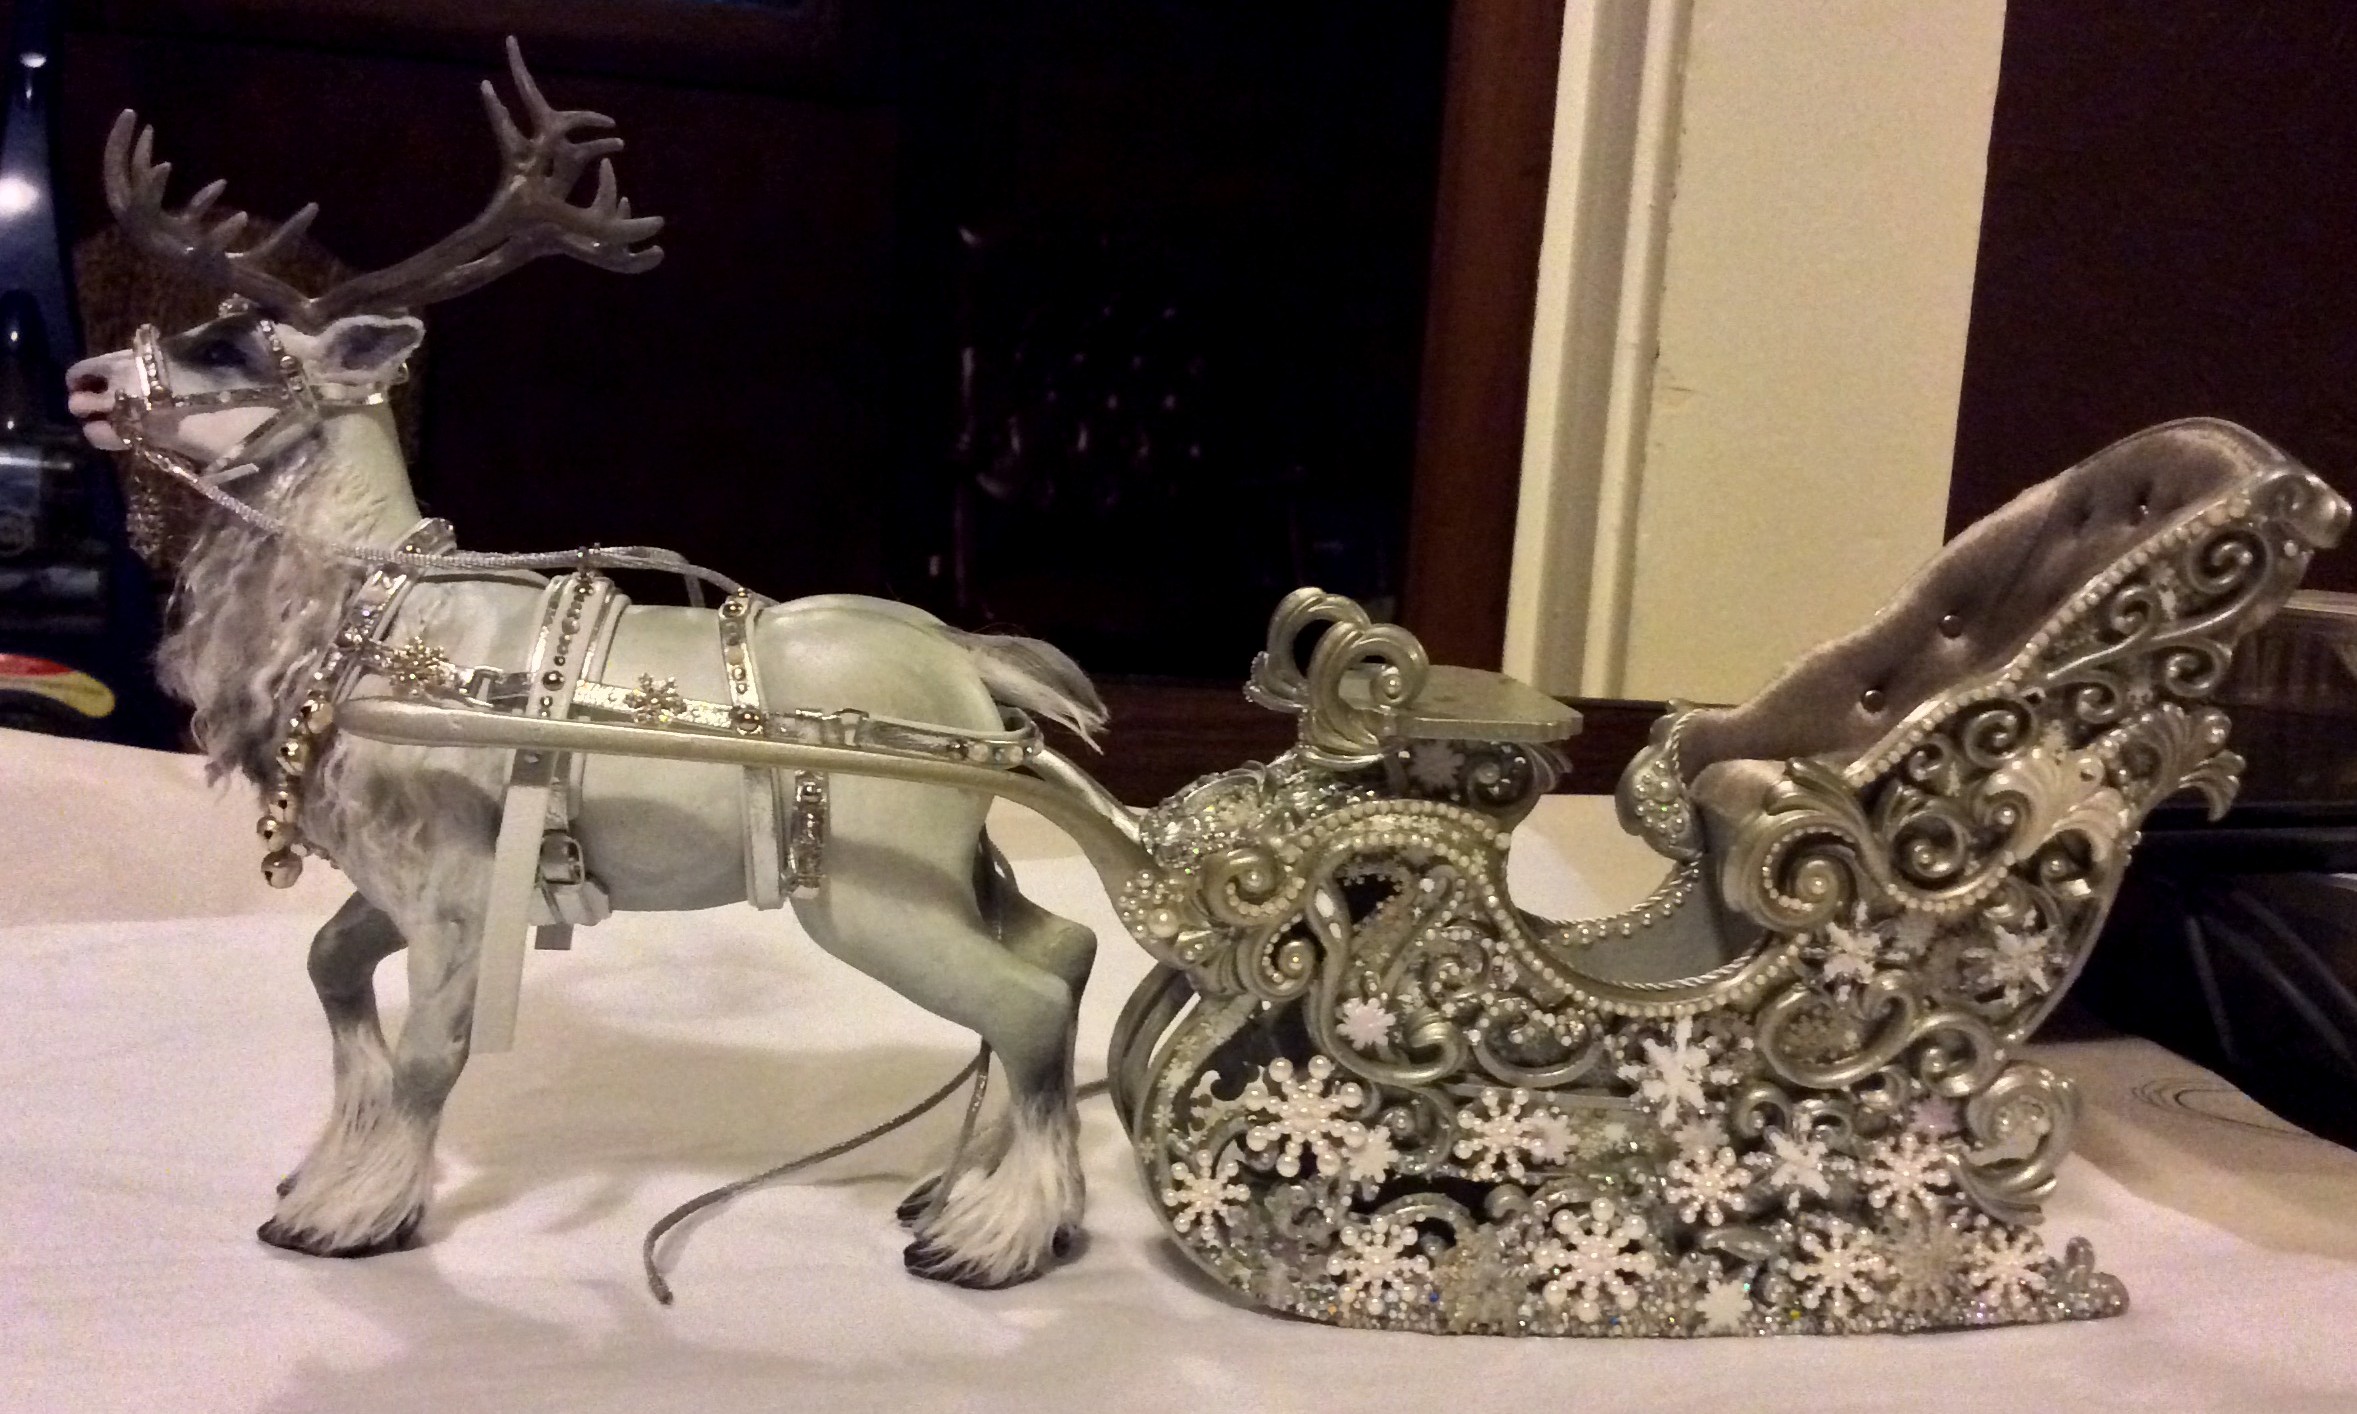
The sledge is made of 3 plastic Christmas ornament sleighs, pvc ornament sleigh pieces, polystyrene sheets and strips, clear polythene sheet, crazy glue and balsa wood, all stuck together with epoxy clay, polished and sanded smooth. (And painted with Tamiya pearl and flake model car paints, another rabbit hole of materials I went down!) It’s decorated with hundreds of the very, very tiniest Swarovski crystals, some smaller than the head of a pin, and tiny, tiny flocked and glittered snowflake decals meant for nail art.
The reindeer is made of a cellulose acetate reindeer from the ’50s, legs sawed off and replaced with new sculpts, and head, body and neck heavily re-sculpted. This kind of Frankensteining is a classic action figure customizing technique; the materials and techniques for creating the miniature harness come from the model horse customizing community, and the handling of the mohair mane from the dollmaking world. I used a Japanese product called Sakura 3D Crystal Lacquer, which is used by Lolis and Harajuki girls to adhere bling to their phones, aka “decoden”, to get a clear dome over its eyes and a gloss of mucus in its nostrils. The flocking on its ears is nail artist’s flock- much cheaper than the art store!
During this process I learned the secret of working with epoxy clay: water.
Epoxy clay is exactly like natural clay in the sense that it’s water soluble; water instantly smooths and softens it. As long as you keep a cup of water (clearly labelled DO NOT DRINK) next to your work surface, all those issues with the granularity of the material disappear. The clay smoothes and holds detail exquisitely. It sticks to itself and to pretty much anything else.
Suddenly, I was in love with sculpting. It’s all about the right material.
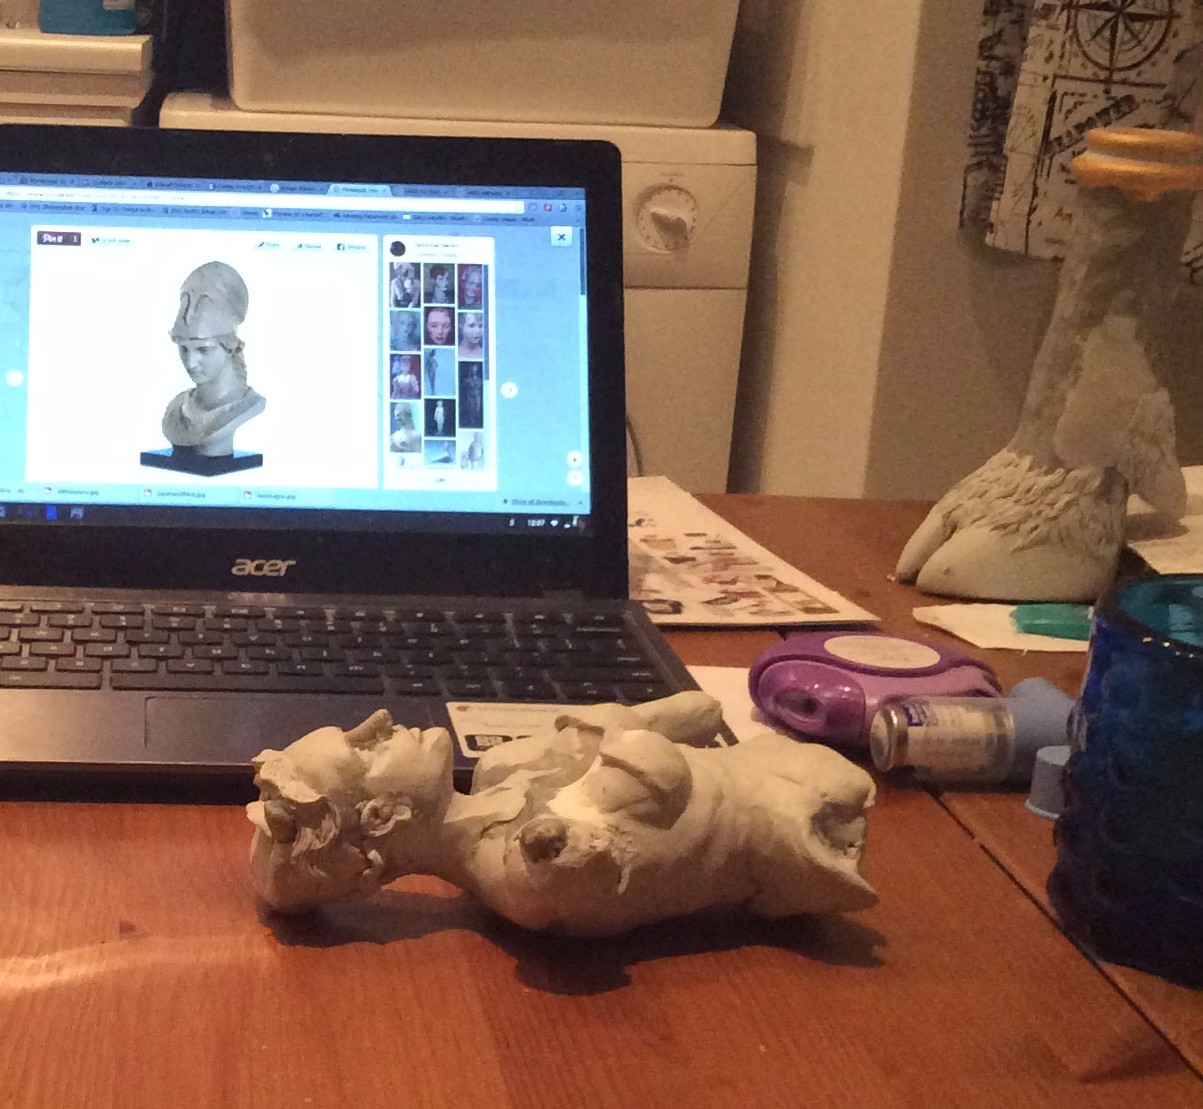
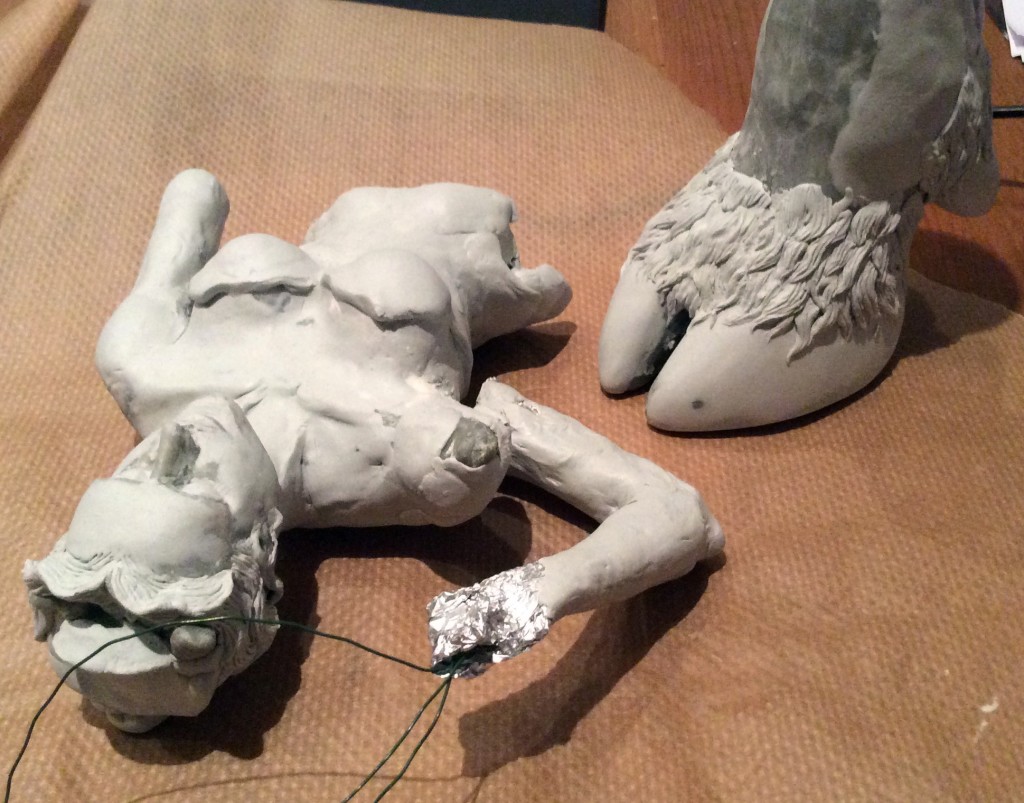 So this summer I decided to make some freehand original epoxy clay sculpts. The goat-foot candlestick is something I’m making not because I wanted to make it, but because I want to have it. It’s built on an armature of tinfoil and a glass caper jar, plus some wood rings.
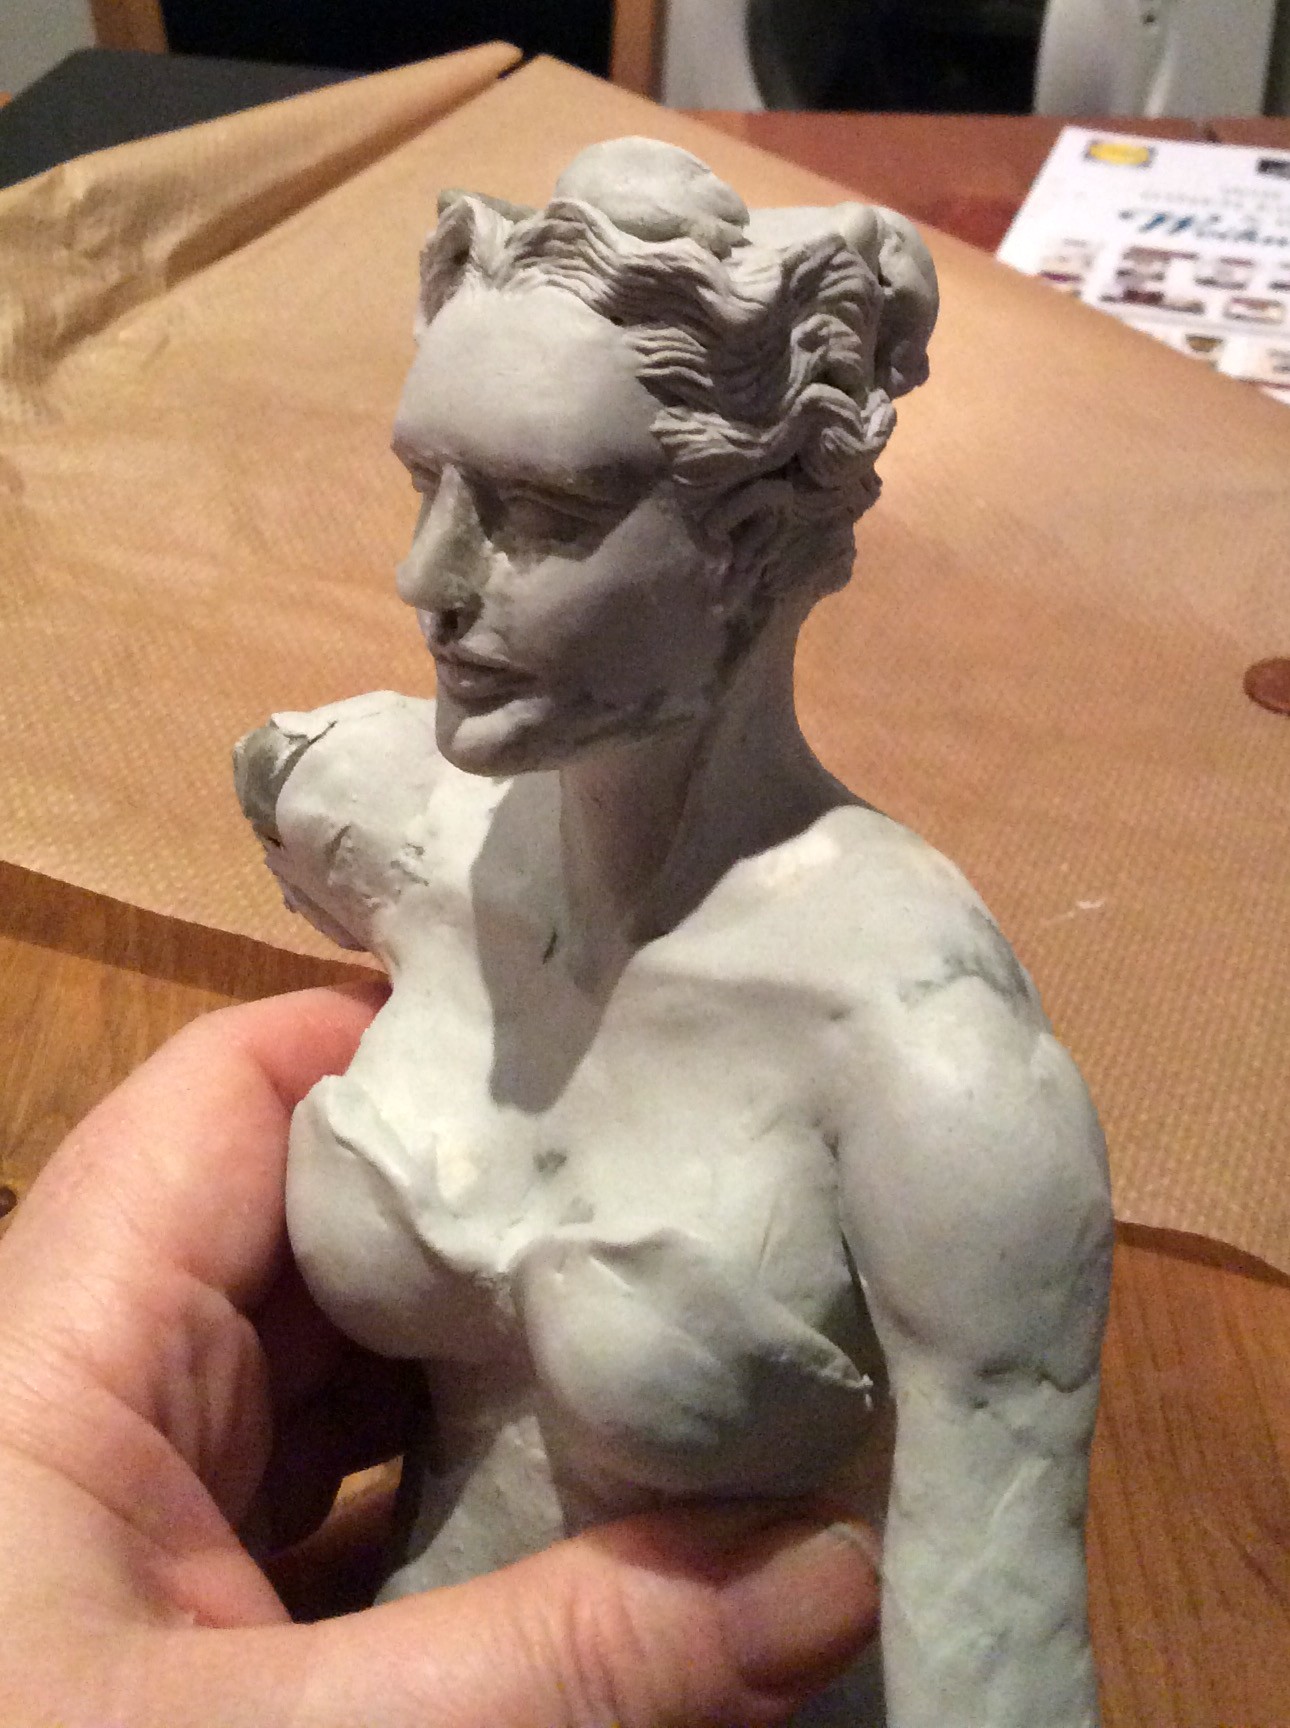
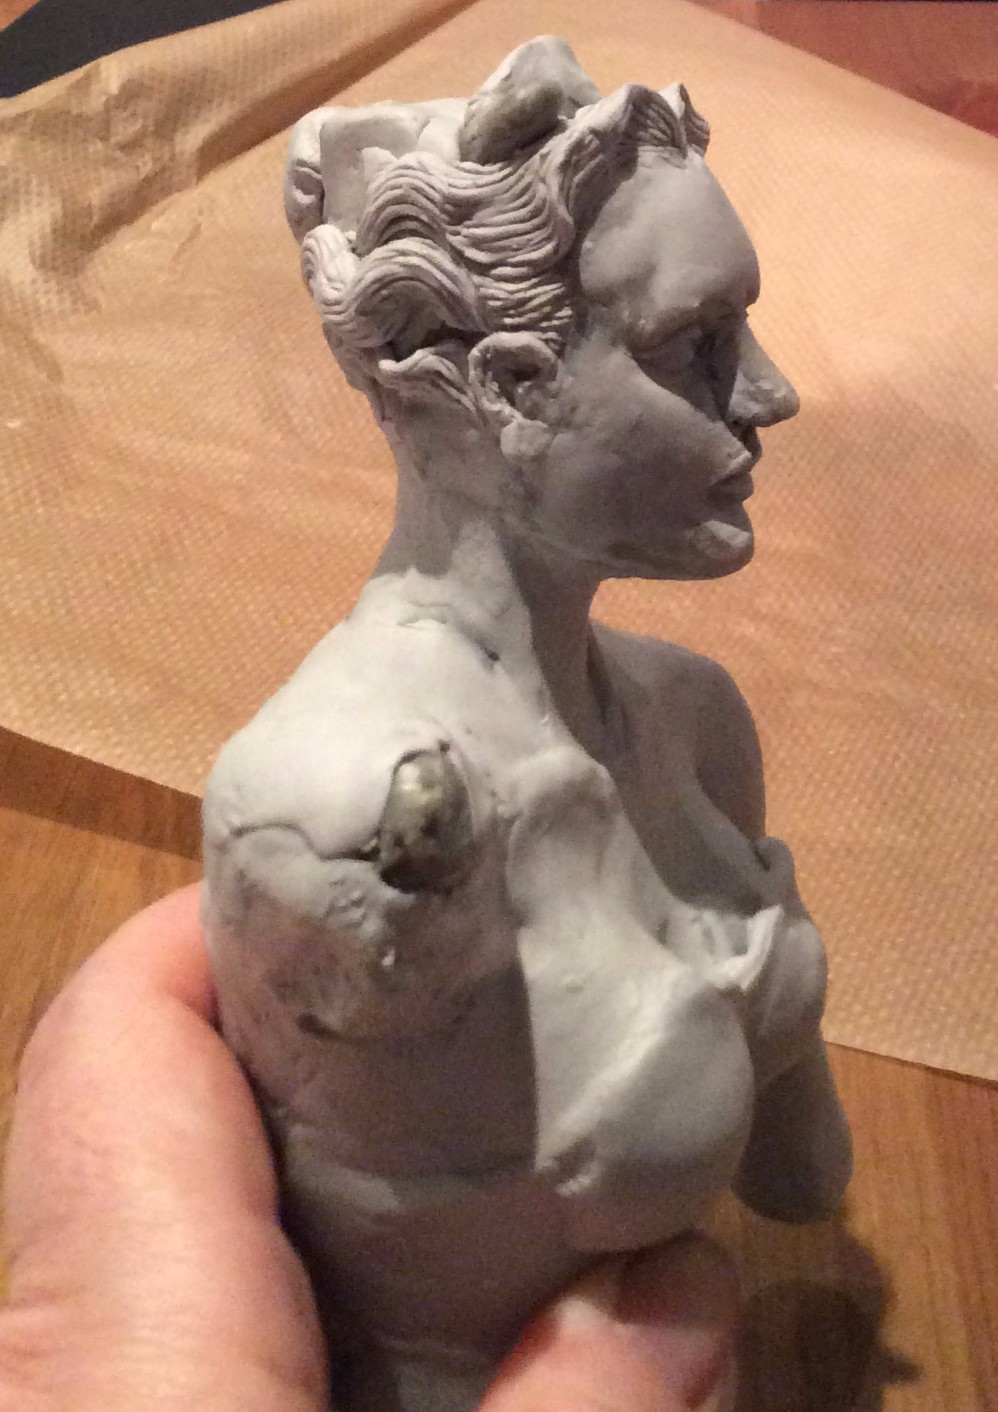
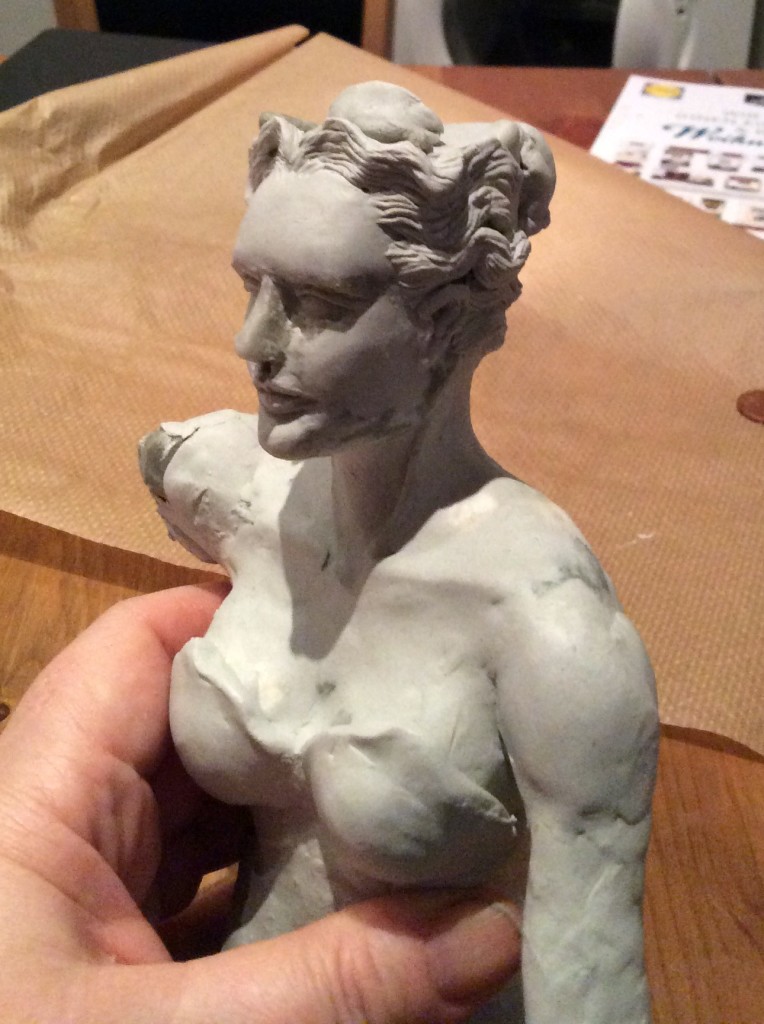
The figure of Diana will be a horned, armored bust, holding a bow, attached to an iron candlestick (which I got at TK Maxx); she is built on an armature of wire and tinfoil. The idea is her horns will cast shadows as the candle flame flickers.
 I was wrong, in college. Sculpting is priceless to the draughtsman.
Just working on the Diana figure for a few months I’ve learned so, so much about representing the figure. So much about planes and mass and the way the figure occupies space.
Speaking of mass, the self-adhesion properties of epoxy clay come in handy as I just keep packing muscle mass onto her shoulders. Because that’s what I love to see in women. (With the [still unfinished, beautiful and evil] Snow Queen, I used a tiny fairy figure as her base, and I kept adding booty to her booty.) Seriously, I wrote a paper in college about the differences between the classically sculpted face and modern beauty standards, and yet making this piece has given me far more understanding.
The other thing about sculpting that’s wonderful for me is that it’s SLOW. For a person who draws and paints as fast as I do, making work that takes deep patience is wonderfully relaxing. There’s something heavenly about just taking my time.
Epoxy clay, though delicious to work with, also has drawbacks.
 It’s very, very expensive to get over here, so I use tinfoil to create as much of the bulk of the sculpt as possible. You can also sub in polymer clay for some parts of your sculpt- people on the internet say it’s perfectly safe to bake cured epoxy clay, so of course I did. But I didn’t like the contrast of the materials.
When the plumbers came to fix our sink they used epoxy clay to seal the tiles back in; I should have asked them where they get it, but they don’t speak a word of English and insist on asking their Siri to tell me everything, which drives me nuts.
And it has potential as an allergen, possibly one with a lifetime body burden tipping point.
I had that experience with black hair dye- happily gothing it for years, then one day I left it on too long, and then every time I tried from then it got worse. I gave up on black hair the day I had to pull my car over because lymph fluid was dripping from my broken scalp into my eyes. Oy, what an idiot. Not doing that again. If I start to have a reaction to epoxy clay I’ll give it up.
Meanwhile, I find doing the mixing together of the two elements with gloves on seems to reduce its adhesion to my hands while actually sculpting. Some people use barrier creams to protect their hands. I use silicon sculpting tools, because if you use metal they just become lumps of epoxy clay! During the process of these two pieces I switched from “natural” clay to “White”, which is actually still grey.
I found the white clay to be much finer textured, better for holding fine detail and not faintly translucent the way the natural clay is. You can see traces of the natural clay around Diana’s nose. With the Snow Queen, I periodically sprayed her with Krylon Fusion to get an allover finish; this let me check the symmetry and shape of the sculpt more easily, and the clay just stuck right on over it. But this is the Land of No Krylon. I may paint her with white artist’s acrylic instead, before I do more work on her. I want to get some Rio Rondo teeny tiny carbide files, too, to drill out her nostrils.
I like Apoxie Sculpt white better than Magic-Sculpt, which was the first epoxy clay I tried, although I like the Magic-Sculpt better than the natural Apoxie. Magic-Sculpt has no greasy feel at all, which I appreciate; the white Apoxie has much less than the natural. They have metallic epoxy clay now too, which I crave but can’t get on Amazon.de. YMMV; there’s miles of debate on these materials out there. I love materials research, so I read a LOT of it, but ultimately the magic of epoxy clay, like natural clay, is that to know it you have to use it.
Sculpting with a material that hardens involves time, and handling, and learning the sweet spots in the hardening process for each technique.
Like baking bread, you just have to practise sculpting- so that’s what I’m doing. It may be a year before these pieces are done; I have time.
“Ars longa, vita brevis, occasio praeceps, experimentum periculosum, iudicium difficile.”
*quote from a beloved friend/muse/patron


 I was concerned that making hundreds of tiny holes in the plastic wrap would make it essentially perforated, since plastic lacks the warp and weft of fabric. And I wanted more texture, so I added an overlay of lacy stuff.