
 I have begun to experiment with making desserts in Europe.
Although I once made spaghetti puttanesca for my second ex-husband’s family in Melbourne, I’d never done any baking anywhere but in the US. Since we’re living in a temporary furnished apartment while we sort out getting our stuff here, I am limited to the equipment in the apartment and the Bosch hand mixer I ordered off Amazon.
Let me insert here just how fucking insane it is to replace EVERY MACHINE IN YOUR HOME. Do you have any idea how many machines and electrical devices you have in your home?¹
Years of professional baking gave me the skills to create dessert under completely raggedy-ass conditions. My best hacks and tips are revealed here!
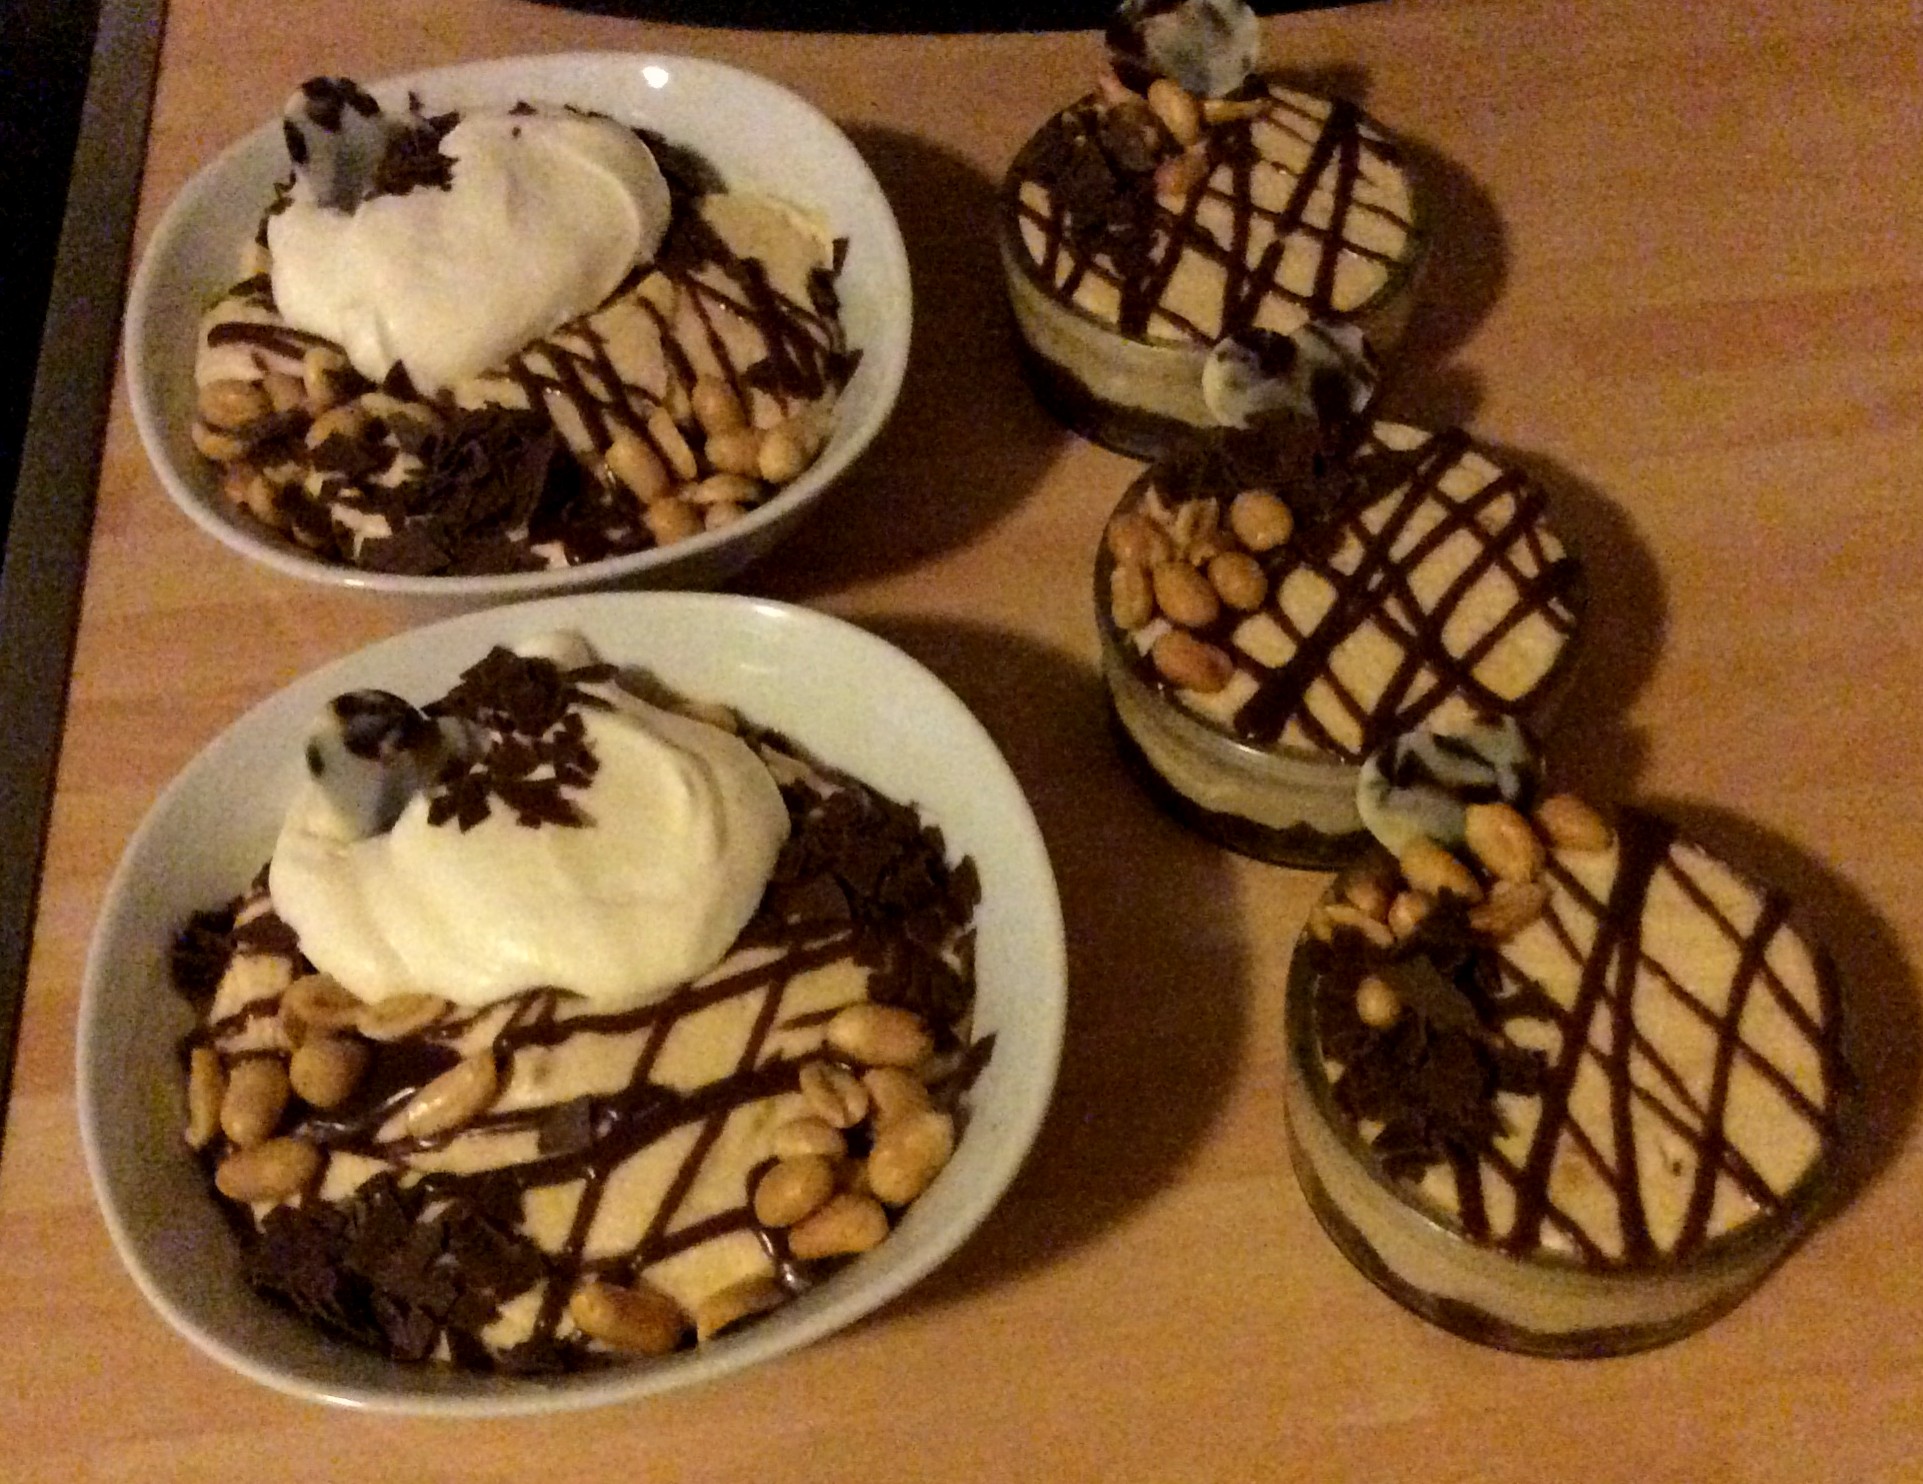
So far what I’ve made is peanut butter mousse pie, once today for my third husband’s birthday (it’s his very favorite thing I make) and once for a potluck. I see all the time on expat boards people talking about how much they miss chocolate & peanut-butter desserts. Also, I knew the hostess of the potluck likes chocolate-peanut desserts because I’d seen her have one at Cafe Anna Blume, the delightful cafe in the American Quarter aka Prenzlauer-Berg.
I am that weird person who sneakily observes every dessert you eat and keeps a mental database, so I know what you like.
Variations of peanut-butter refrigerator pie date back at least to the 50s, and I have made many, but the basic components are a graham cracker or chocolate cookie crust, peanut butter whipped with confectioner’s sugar and cream cheese and lightened with whipped cream folded in, and a chocolate ganache. (They have a very good version at Homeroom in Oakland that skips the ganache, but I like it to cut the richness of the peanut butter.)
The recipe below is for the version I made for the potluck, as opposed to the individual dishes I made for the husband. (So he can take some to work tomorrow!)
*if you just want to make peanut butter pie, with actual measurements and without reading all my nonsense, this recipe from Sally’s Baking Addiction is excellent.
I had been warned on the toxic expat board Toytown and elsewhere that you can’t get measuring cups and spoons in Germany.
(Europeans tend to measure baking ingredients by weight rather than volume). Actually, I’m sure you can get them at Cakeville in P’Berg, which is not as amazing as Spun Sugar in Berkeley, but a very decent baking shop. I had intended to bring mine, but in the chaos of the last days failed to.
So, here’s what I did.
Bought:
- Puder Zucker (confectioner’s sugar), box
- 2 100g bars of dark chocolate, one Lindt excellence and one of the Ja! generic brand, which was .49!!
- 500g Bottle of 32% fett Schlag Sahne (heavy cream)
- Sleeve of Leibniz Vollkorn cookies (good approximation of graham crackers)
- 350g tub of “Barney’s Best USA©Made Creamy Peanut Butter”, bought at a Mitte Rewe where there are probably more American customers than German at this point
- ZImt (cinnamon, to add to the cookies)
- 250g tubs each of mascarpone and butter
Then: No pie or tart pan, so I took a deep Pyrex (mirror-world Pyrex-analog?) casserole dish, buttered it and lined it with the baking parchment I had bought at the Euro store for a Euro. The parchment is brown and slightly corrugated, like the recycled parchment you buy at Whole Foods for seven dollars. I ran the parchment up the sides at the ends, so I would have something to lift the pie out with.
I needed to make sure I could bring the baking dish home, because apparently they are very intense here about the stuff in a furnished flat or sublet.
No food processor or large Ziplock bag and rolling pin to crush the graham crackers: dumped the walnuts out of a ziplock bag from Rewe, filled it with crackers, and crushed them with the heel of my hand. It doesn’t matter if there are little uncrushed pieces.
No bowl, so I used a large cooking pot with low sides.
No brown sugar, but as anyone who’s ever run a torch over powdered sugar on top of a brulee knows, powdered sugar can caramelize and bind a cookie crust too. So I dumped about a half-cup of powdered sugar (I would have used only 1/3 of brown) and a couple shakes of Zimt in with the crushed cookies and stirred well. (Peanut butter loves cinnamon. The surprisingly excellent house-made loss-leader peanut butter cookies at WF are much enhanced by it.)
I learned from my Goddess Rose Levy Beranbaum to always mix dry ingredients well before adding wet.
Put about half a tub of butter in a bowl and microwaved it til partly melted, then let residual heat melt the rest. Took the slightly-cooled liquid butter and poured half into the crumbs, stirred thoroughly, and tested the stick-to-itselfness of the mixture. I added more butter to make it less crumbly, more Play-doh or wet-sand textured, and then used my hands to press it into the casserole dish. (Surprise: in bakeries bakers use their hands to scoop EVERYTHING.)
I baked it at 180°C or 350° for fifteen minutes, which is pretty standard for a crumb or nut crust.
I was confident that the cornstarch in the powdered sugar, mixed with the water in the butter, had been heated long enough to help bind the crust as well. It felt right when I took it out: very slightly puffy and browned at the edges, and it was homogenous to the touch. I don’t know why nut and crumb crusts, which have no leavening and no raw gluten, puff up a bit in baking, but they do.
While the crust was baking I scooped most of the peanut butter out of the jar into my “bowl” and beat it til fluffier with my new hand mixer, which had a surprise feature. Click the speed wheel right you get the normal graduated speed; accidentally click it left and it goes instantly to a speed no American hand mixer I’ve ever used possessed. Yikes! I added about half a cup of powdered sugar and beat that in well, then beat in most of the tub of mascarpone.
Fluffy peanut butter mascarpone frosting! Pipes like a dream on cupcakes.
Pretty stable at room temp, so nothing needed to happen with it immediately.
I took the pan of baked crust and threw it in the freezer to cool. (When you do this, avoid setting it on plastic ice cube trays that could melt. ) Surprise- I had not allowed for the low power of our tiny German freezer, which does not chill nearly as well as a full-sized American one. Oh well.
Meanwhile I made the ganache. I normally make ganache in a food processor, using the Rose method, which is great if you hate chopping chocolate (sticky, greasy AND it stains; chocolate is the devil).
This time I used the Alice Medrich method², because melting chocolate in a double boiler is for schmucks.
I broke up all the Ja! bar and half the Lindt bar, and put them in a ceramic bowl. The Ja! was a little acidic and lecithiny but perfectly fine for a ganache that would be covered by a strong flavor like peanut butter. I saw I had about three tablespoons of melted butter left, so I poured that into the bowl too. Then I added about a third of a cup of cream. I stirred it well, getting liquid on all the pieces of chocolate. The liquid, as long as it’s enough and well stirred in, protects the melting chocolate from bad behaviour.
What I was going for was a ratio of slightly more liquid than chocolate, for a ganache that would be firm enough to cut but not stiff when served cold.
(Rose explains so much about ganache, including the cream ratio, in the Cake Bible.) I turned the dial (no fancy digital inputs on German microwaves!) on our microwave to low and nuked the mixture for a minute. A minute is a long time for chocolate, although dark chocolate tolerates heat better than milk or white, so I yanked it out and stirred it to distribute the heat. Another quick burst of waves and the liquid in the bowl was hot enough to melt the remaining chocolate as I gently stirred it. See the footnotes for more on melting chocolate!
I could tell by eye it was tight (chef talk for viscosity) enough for my purposes; a thread dropped from a spoon sank quite slowly into the dark pool.
I let it sit while I pulled out the crust. The pan bottom was still hot, ( German freezer bah!! ) so I knew that the crust would crumble if i touched it or tried to spread ganache on it. So instead I poured almost all the ganache into the center of the crust and pushed it out to the edges, using my square slotted wooden spatula I bought at TK Maxx our first week here. (Wooden utensils are the soul of a kitchen, I had to have at least one.)
Pushing out from a big central bolus meant most of the loose crumbs that would normally lift were trapped under the wave front of ganache.
(This is how I learned to frost cakes fast and perfect in my first finishing job, a night shift at at European bakery in DC. I never, ever bother with a crumb coat. I’ll make a video sometime.) Of course it wasn’t perfect, but it’s chocolate and cream and cookie crumbs; there’s no real pain point there. Then I zipped it back into the freezer so the ganache could cool off before the heat remaining in the crust could cause it to break, or separate into fats and solids.
In a professional kitchen, you are constantly shifting trays in and out of the walk-in and freezer, to save time and control reactions.
I poured the remaining about three-quarters of the cream into my pot and put the rinsed-off³ beaters back on the mixer. I considered taking the precaution of chilling the “bowl” and beaters, since I didn’t really know how the 32% fett compared to the organic Stornetta cream I’d been using for years and the kitchen was hot. But I said fuck it, because in my experience cream really only fails to whip if you are trying to whip a small amount in a hot-out-of-the-dishwasher bowl and you don’t ratchet up the mixer speed fast enough. Over a cup of cream that’s been in the fridge til whipping and you’re generally fine. And indeed it was, although it took longer than usual for the cream to crease and then billow.
I did take the precaution of whipping to very soft peaks.
I knew the amount of clumsy folding the cream would have to endure to incorporate with the peanut-butter mixer in a pot with a slotted spatula was enough to risk it going grainy. I am a superb folder, if I do say so, and I dumped the peanut butter mix into the pot of cream and folded fast. Watch some videos of chefs folding if you want to get a handle on technique; it’s great to be able to make a souffle without feeling nervous.
Normally I would have folded a third of the whipped cream into the mixture I was incorporating it into first, to lighten it.
But I was concerned the room temperature mascarpone might be shocked by the cold cream and start forming larger fat globules (aka gross chunks) pretty quickly, so I just went for it. It came together nicely in a fluffy cloud, which I immediately plopped onto the ganache in the crust.
Of course, the ganache hadn’t set yet (German freezer!), so again I had to spread carefully from the center. I threw the whole thing back in the freezer while I got the piping ganache ready. I’d left the remaining couple tablespoons of ganache in the bowl on the flat glass cooktop, which had enough residual warmth to keep it liquid. In commercial kitchens you always find a bowl of ganache or chocolate thinned with oil or water sitting in some 98º spot, ready for piping or dipping.
I didn’t have a plastic piping bag, so I made a paper cornet.
This is one of the things you learn to do right away in a commercial bakery, and you will never be sorry you learned it. The important part is wiggling all the points of the triangle til they line up and the point is tightly closed. Then I spooned the remaining ganache into the cornet, folded it closed, snipped the very tip off with scissors, and used it to to drizzle a zig zag over the top of the pie. Always, always cut off only a tiny bit of the tip first, and test it on a plate.
Lots of baking “tips” resources will tell you to fill a ziplock sandwich bag with chocolate chips and microwave them, then snip a corner, instead of learning how to make a cornet.
 The results from this “tip” are terrible, because you’re using an oval hole instead of a round one, and chocolate chips are loaded with lecithin to survive baking; they’re not meant to be eaten straight or melted.
The melted chips will almost always lose temper or “bloom” when refrigerated and you’ll have ugly white dots of separated fat on your piped lines.
I put the pan of pie on a dish towel, soaked in cold water and wrung out, on the counter. This was both to drop the temperature of the crust a bit more and for control.
A dish set on a damp towel won’t skid away from you across the counter.
Once I’d done the piping, I took chopped peanuts and ran them around the edge of the pie, along the sides of the pan. Then I added Raspelschokolade, chocolate flakes. This is an one of the decor products that are in every supermarket in Germany but in the US were only available from specialty stores until recently.
Layering decor is key to getting a finished look.
Done decorating, I put the pie in the fridge overnight. Whipped cream desserts ( I can’t speak for whipped topping desserts, since I’d chew off my own arm and candy it like a violet before I’d use whipped topping) need to chill in a fridge for six to eight hours to stabilize. Just freezing them won’t do it, because it’s not just about dropping the temperature. Something happens with the fat molecules so they firm up. I don’t know what, I’m not a food scientist, I’m just an artist who’s been lucky enough to hustle food service jobs whenever I was in danger of starving.
In the morning, I took the pie out of the fridge and put it in the freezer. We were travelling a good half-hour across town, to a party where the pie would likely sit on a sideboard for an hour or two before it was eaten. I knew that freezing it wouldn’t affect the flavor in any way, and would make transporting it much safer and eating it much pleasanter. Whipped cream desserts are much better almost still frozen than warm at all.
Things that are mostly flour or mostly fat can be frozen without suffering any ill effects, if handled correctly.
(Rose goes into freezing desserts and dessert components in incredible detail in the Cake Bible. It’s perhaps the most useful information in a book that is 110% useful information.) Trust me, if you’ve ever had some crazy fancy cake I made or been to a party where I made a dozen different desserts, those babies had been frozen. The secret to freezing is plastic wrap. You have to wrap the dessert completely in plastic wrap. You must protect it from the freezer environment, and even more importantly, you must keep it protected as it thaws.
You want the condensation created by the temperature differential of thawing outside on the plastic wrap, not on the surface of your dessert.
Commercial bakeries, even the very very fanciest ones, have trays and trays of cakes and pies and mousses in the freezer. If you’ve had wedding cake, it was frozen at some point. Often the freezers have drawers, so the frozen goods are in a secure, cake-only environment, safe from contaminating flavors or smells.
When we served the pie at the potluck, it had been sitting on a sideboard long enough that the butter between the parchment lining and the pan had softened, making it super easy to lift the pie out of the pan.
 Think of butter as a miracle adhesive/lubricant.
You can use a smear of buttercream to hold a cake tier in place on a cardboard circle once it’s cold, or use it to slide a bombe out of a buttered mold if you warm the outside of the mold by running a hot, moist dish towel over it.
The pie was a huge hit, and late that night my husband asked mournfully, “Is there any peanut butter pie here?”
I had only made enough for the party, as he well knew, so I had to make it again for his birthday…
¹Replacing every machine in your home: The only ones we didn’t sell or donate were our computers, which are designed to run on either type of current, and my sewing machine, since it was the most expensive machine I’ve ever bought besides the dishwasher I left in my long-lost house in Berkeley. Step-up step-down transformers run to a hundred bucks each and are notorious for frying electronics, but I’m going to try one with my sewing machine anyway, because I cherish it so.
Here’s our list:
Halloween electric lights, 10 sets
Halloween fog machine, strobe lights
Christmas electric lights, 5 sets
extension cords and power strips, dozen or so
Shredder
All-in-one printer/scanner
2 fans
Air Conditioner
humidifier
space heaters, 2
electric mattress heater
toaster oven
Washer / Dryer
Food Processor
hand mixer
floor lamp
3 table lamps
Microwave
foot massager
“back massager”
lots of other “back massagers”
coffee machine
Hair dryer
Crimping Iron
2 Curling Irons
Art supplies:
2 electric lightboxes
2 Full Spectrum artist lamps
Crazy, right? So far we’ve bought German-power-compliant versions of the toaster oven, the microwave, the printer, hub’s hair dryer, a fan and a hand mixer. Long way to go.
²Alice Medrich’s Cocolat shop was the first San Francisco bakery I ever went to, in 1987, and Cocolat was the first serious baking book I ever bought. I learned from Cocolat that melting chocolate in a double boiler is for schmucks.
Here’s the thing: a small quantity of liquid introduced when chocolate is melting makes it seize. Double boilers involve steam and drips of water. Instead, I ALWAYS melt chocolate, finely chopped, in a bowl in the microwave. You must wipe out the microwave thoroughly first to make absolutely sure there are no condensation drops waiting to fall or off flavors from leftover food dribbles (white chocolate is especially vulnerable to invasive flavors).
If you will be adding the chocolate to a recipe that has ANY liquid at all, you can take a few tablespoons (at least two T per 8oz, I think) of one of the liquids (water, milk, cream, melted butter, oil, orange juice, rum) and stir it well into the finely chopped unmelted chocolate. Then cover the dish of chocolate, or chocolate and liquid, with plastic wrap to protect it from off flavors and moisture, and microwave it in ridiculously short low-power bursts, stirring every few seconds, until most of the chocolate is melted.
Once it’s removed from the microwave it will continue to melt, so err on the side of caution. Perfect, glossy melted chocolate, with no danger of scorching or seizing. I’ve made hundreds of desserts, including a bunch of wedding cakes, and I have never used a double boiler for chocolate since 1993.
³About washing: if you’re just going fat-to-fat, like creamed butter and sugar to whipping cream to beating ganache, a quick rinse of your stainless steel bowls (all I ever use at home) and utensils is plenty. Egg whites can’t tolerate fat or water, so if you’re beating eggs you must wash the beaters with soap and hot water and dry them thoroughly. If you’re cooking with eggs, you must ALWAYS wash anything that has touched raw egg the same way, so your buttercream doesn’t get bacteria in it. An immunocompromised person or pregnant lady could eat it and get very sick, even if you use free-range organic eggs like I always do (because most of the salmonella cases from eggs come from battery hens).
I also always taste a bit of the mix with the raw eggs, since when I’m baking a cake it’s usually at least a day before serving and there’s time for me to get sick if there’s any danger. I know my immune system can handle it, and I’d rather I got sick than a pregnant lady. When I started seriously baking a lot of my friends had HIV, so I’m super-careful.